Table of Contents
About
After my initial self-hosting setup, I tried sharing my self-hosted services externally. Like most people, I started with a VPN because it was easy and secure, but it quickly became a hassle once I wasn’t the only user of my services. After weeks of tinkering with the configurations of different services, I think I have found a good balance between convenience and security. So, in this post I’m going to share my current setup that tries to minimize as much risk as possible with Traefik, Authelia, Fail2ban and Cloudflare Tunnels.
Traefik
Traefik is my reverse proxy of choice, a reverse proxy is a server that sits in front of your services and forwards client requests to those services, acting as a single point of entry to your services from the web. Traefik is compatible with Authelia and has built-in support for docker and SSL. To configure Traefik, you will need to choose a DNS provider, as you will later configure Cloudflare tunnels which requires using Cloudflare for DNS, I recommend configuring your domain with Cloudflare now, so this guide will assume you will use Cloudflare. Here is the guide on how to change the nameservers of your domain.
This is the folder structure that this guide will use, so if you want to follow it, you should recreate it on your system.
./traefik
├── data
│   ├── acme.json
│   ├── config.yml
│   └── traefik.yml
└── docker-compose.yml
You will need to change the permissions of acme.json so Traefik can access and edit this file, run chmod 600 acme.json. Traefik and your docker containers needs to be on the same network, to create a docker network, run docker network create proxy.
Open traefik.yml with your preferred text editor and start by adding the follow lines, this will enable the Traefik dashboard:
api:
  dashboard: true
Next, add the following code to specify the ports that Traefik should listen to, which should be one 80 for HTTP and 443 for HTTPS, this will also set a HTTP to HTTPS redirection.
entryPoints:
  http:
    address: ":80"
    http:
      redirections:
        entryPoint:
          to: https
          scheme: https
          permanent: true
  https:
    address: ":443"
To obtain TLS certificates, you will need to point Traefik to Cloudflare’s DNS resolvers and provide your Cloudflare account email. You will need to specify that you want all the certificates to be stored on the previously created acme.json. To do all that, add the following configuration:
certificatesResolvers:
  cloudflare:
    acme:
      email: EMAIL
      storage: acme.json
      dnsChallenge:
        provider: cloudflare
        resolvers:
          - "1.1.1.1:53"
          - "1.0.0.1:53"
Finally, you will configure Traefik to work with Docker, this will allow Traefik to use container labels to retrieve the custom configuration for that container. For the services that aren’t managed with docker, you will be able to write its configuration in config.yml.
providers:
  docker:
    endpoint: "unix:///var/run/docker.sock"
    exposedByDefault: false
    network: proxy
  file:
    filename: /config.yml
Your complete traefik.yml should look like this:
api:
  dashboard: true

entryPoints:
  http:
    address: ":80"
  https:
    address: ":443"

certificatesResolvers:
  cloudflare:
    acme:
      email: ${EMAIL}
      storage: acme.json
      dnsChallenge:
        provider: cloudflare
        resolvers:
          - "1.1.1.1:53"
          - "1.0.0.1:53"

providers:
  docker:
    endpoint: "unix:///var/run/docker.sock"
    exposedByDefault: false
    network: proxy
  file:
    filename: /config.yml
Now it is time to create the Traefik container with this docker-compose.yml:
version: '3'

services:
  traefik:
    image: traefik:latest
    container_name: traefik
    restart: unless-stopped
    security_opt:
      - no-new-privileges:true
    networks:
      - proxy
    ports:
      - 80:80
      - 443:443
    environment:
      - [email protected]  # Cloudflare's account email
      - CF_DNS_API_TOKEN=YOU_API_TOKEN # You can also use the API KEY

    volumes:
      - /etc/localtime:/etc/localtime:ro
      - /var/run/docker.sock:/var/run/docker.sock:ro
      - ./traefik/data/traefik.yml:/traefik.yml:ro
      - ./traefik/data/acme.json:/acme.json
      - ./traefik/data/config.yml:/config.yml:ro
    labels:
      - "traefik.enable=true"
      - "traefik.http.routers.traefik.entrypoints=https"
      - "traefik.http.routers.traefik.rule=Host(`traefik.domain.com`)"
      - "traefik.http.routers.traefik.tls=true"
      - "traefik.http.routers.traefik.tls.certresolver=cloudflare"
      - "traefik.http.routers.traefik.tls.domains[0].main=domain.com"
      - "traefik.http.routers.traefik.tls.domains[0].sans=*.domain.com"
      - "traefik.http.routers.traefik.service=api@internal"

networks:
  proxy:
    external: true
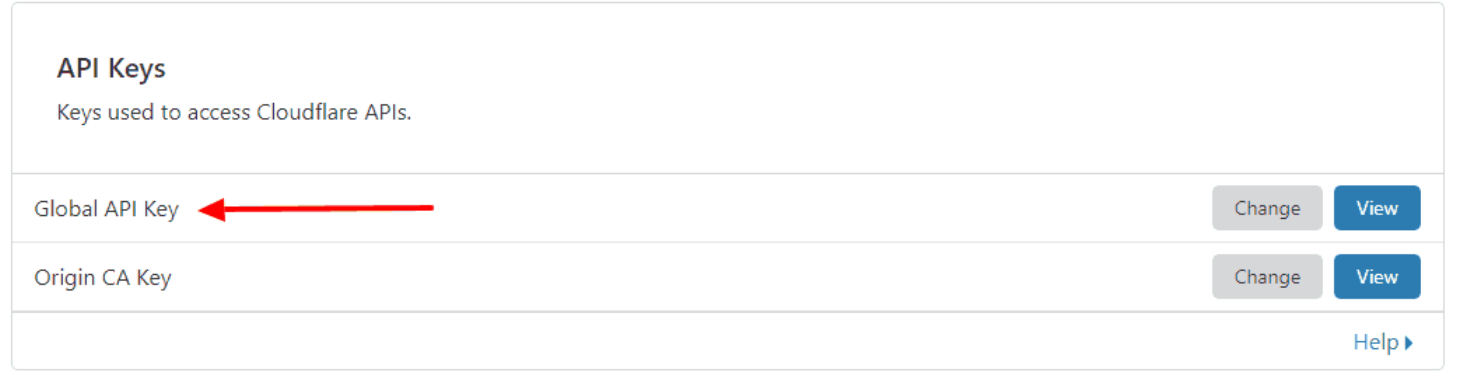
First you will need to pass as environment variables your email from your Cloudflare account and your API Key, wbich can be found on Profile > API Tokens > Global API Key.
With the labels, you are creating a router called traefik, a router is the tool that connects a requests from a entry point to a service. In this case, it will listen to the entrypoint HTTPS on the domain traefik.domain.com. Then, it will be requesting certificates for domain.com and any of its subdomains with cloudflare. Spin up the container with docker-compose up -d and if you go to your Cloudflare dashboard and create a DNS record for traefik.domain.com pointing to your computer’s internal IP, you should be able to see your traefik dashboard on that domain.
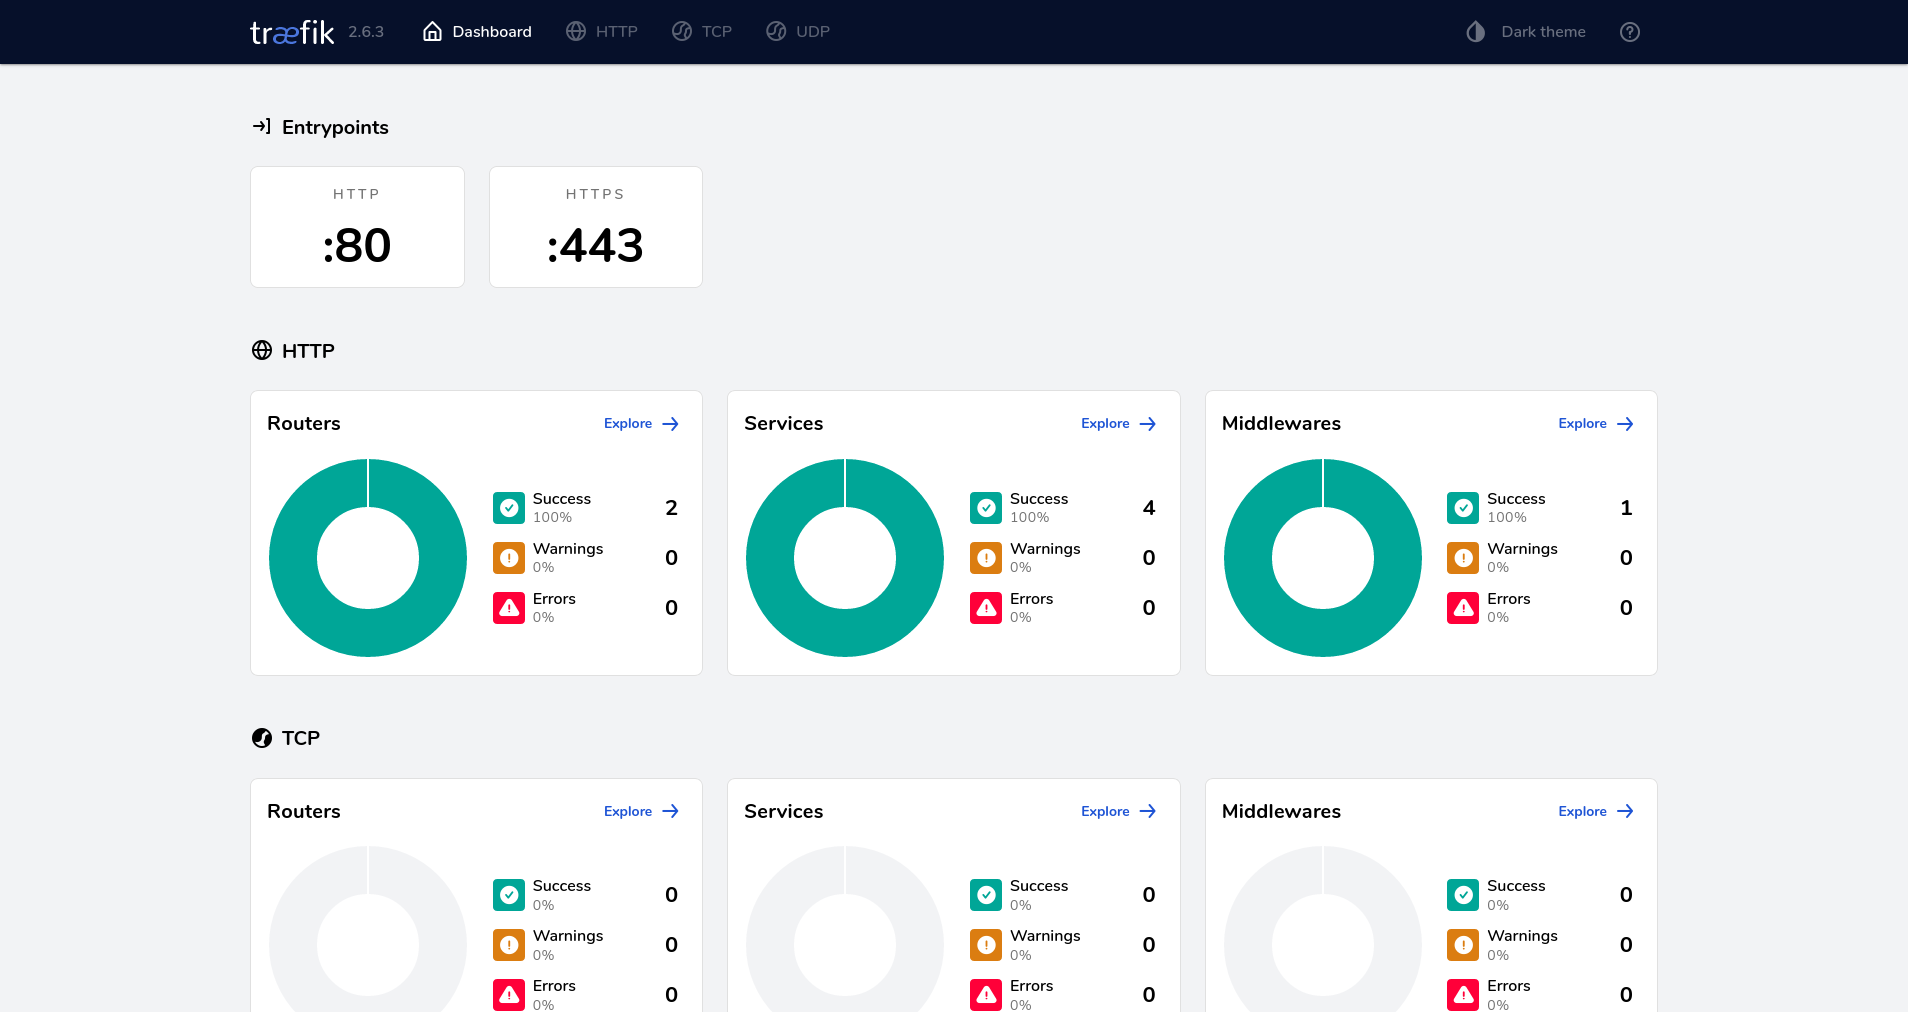
You can use this dashboard to visualize the entrypoints, routers, middlewares and services that you are using in Traefik. This is how the dashboard should look like:
If you can see the dashboard, it means that you now have Traefik running, and it is working with Docker, the next step is to proxy requests to other docker containers. You will need to connect the service to the traefik network and add some labels, to do so, so add this to the docker-compose.yml file of your service:
    networks:
      - proxy
    labels:
      - "traefik.enable=true"
      - "traefik.http.routers.service-name.entrypoints=https"
      - "traefik.http.routers.service-name.rule=Host(`service-name.domain.com`)"
      - "traefik.http.routers.service-name.tls=true"
      - "traefik.http.services.service-name.loadbalancer.server.port=service-port"

networks:
  proxy:
    external: true
You are telling the service to use the previously created proxy network. You will need to edit service-name with how you want to identify this configuration, which can be simply by the name of the application. Finally, change service-port with the port that the service uses by default. With this, you can remove the ports: ****:**** entry from your docker-compose.yml, making the service only accessible from the domain.
To proxy requests to a non-docker service, add this to the previously mentioned config.yml:
http:
  routers:
    sonarr:
      entryPoints:
        - "https"
      rule: "Host(`sonarr.domain.com`)"
      tls: {}
      service: sonarr

  services:
    sonarr:
      loadBalancer:
        servers:
          - url: "https://192.168.1.103:8989"
        passHostHeader: true
This will create a router that will listen on sonarr.domain.com and show the service hosted at https://192.168.1.103:8989. Sonarr is the name of a application that can automatically download new episodes of your favorite shows. If you are interested, here is a post on how to set up Sonarr and few other related services.
As you have seen, Traefik makes it easy to configure more docker services, as you only need to add some labels to its docker-compose.yml. In addition, you don’t even need to restart the traefik container when you add new services to proxy traffic.
Authelia
Now that you have learned how to use Traefik, you will set up Authelia, which is a service that will provide an authentication server for the services that doesn’t include it, so you can prevent anonymous people from using your services. It is really easy to set up with Traefik so let’s get into it.
First create configuration.yml, and start by defining the following lines.
server:
  address: 'tcp4://:9091'

log:
  level: info
  format: text
  file_path: /var/log/authelia/authelia.log

theme: dark
This sets the host to any IP and the port to 9091, save logs to a file and set the theme to dark. Next to set your JWT Secret add the following line, you should use a random and long string.
identity_validation:
  reset_password:
    jwt_secret: LJQsMC5tbcaUycvkjpGQzEeR4hP9N587qv7WwH9rvsCvWgQJePp4nFoByT97
Then add the following configuration:
totp:
  issuer: authelia.com
Let me explain what this does, Authelia will normally redirect back to the website the user was trying to access after correctly authenticating, however when a user visits the sign in portal directly, there is no website to redirect back, so with default_redirection_url you are telling Authelia to redirect to https://auth.domain.com in these cases. With the next two lines, you are setting up the name detected by your TOTP application for your Authelia service.
After that, add the configuration for your authentication backend next, this will set Authelia to use a file-based authentication by storing user information at users_database.yml with one of the strongest hashing algorithms for passwords, argon2id.
authentication_backend:
  disable_reset_password: true
  file:
    path: /config/users_database.yml
    password:
      algorithm: argon2id
      iterations: 1
      salt_length: 16
      parallelism: 8
      memory: 64
To create a new user, save configuration.yml and create users_database.yml. The following code will provide an example with two users:
users:
  your-user-name:
    displayname: "User Name"
    password: "HASHED_PASSWORD"
    email: [email protected]
    groups:
      - admins
      - dev
  anon:
    displayname: "Anon"
    password: "HASHED_PASSWORD"
    email: [email protected]
    groups:
      - dev
As said before, the password needs to be hashed with argon2id, to get your hashed password run in your terminal:
docker run authelia/authelia:latest authelia hash-password 'yourpassword'
This should return your hashed password which should replace HASHED_PASSWORD:
Password hash: $argon2id$v=19$m=65536$3oc26byQuSkQqksq$zM1QiTvVPrMfV6BVLs2t4gM+af5IN7euO0VB6+Q8ZFs
After setting up your users, continue with the configurations at configuration.yml. It is time to configure your access controls, here is where you set rules for each of your sites, so it will depend entirely on your preferences, you should check the documentation to see all the possible options. This is an example configuration:
access_control:
  rules:
    - domain:
      - "*.domain.com"
      policy: one_factor
      subject: "group:admins"

    - domain: send.domain.com
      policy: two_factor
      subject: "user:anon"
What this is doing is that all the users who belong to the admins group can access all the websites at the subdomain of domain.com and will only need one factor authentication which is just providing username and password. Then, the user named anon, can only access send.domain.com and will need two factor authentication which requires TOTP.
Next, to configure how authentication cookies are stored, add the following code:
session:
  name: authelia_session
  # This secret can also be set using the env variables AUTHELIA_SESSION_SECRET_FILE
  secret: # another long and random string
  expiration: 8h
  inactivity: 2h
  cookies:
    - domain: 'domain.com' # Should match whatever your root protected domain is
      authelia_url: 'https://auth.domain.com'
You will need to edit the expiration and inactivity time. Expiration refers to the time before the cookie expires and the session is destroyed, while inactivity indicates the time a user can be inactive until the session is destroyed.
The next section is regulation, here you will provide some rules to stop brute-force attacks, this is an example with a ban time of 5 minutes if there are 3 failed login attempts in less than 2 minutes.
regulation:
  max_retries: 3
  find_time: 2m
  ban_time: 5m
Add the following code, to tell Authelia to use the built-in session storage using SQLite, which is sufficient for a single-user environment.
storage:
  encryption_key: # a_very_important_secret
  local:
    path: /config/db.sqlite3
Finally, you will need to configure where Authelia will send messages for password resets and other stuff. You can use SMTP for sending emails or via text files. If you want to keep it simple, use text files.
notifier:
  filesystem:
    filename: /config/notification.txt
This is how your configuration.yml should look like:
###############################################################
#                   Authelia configuration                    #
###############################################################

server:
  address: 'tcp4://:9091'

log:
  level: info
  format: text
  file_path: /var/log/authelia/authelia.log

theme: dark

# This secret can also be set using the env variables AUTHELIA_JWT_SECRET_FILE
identity_validation:
  reset_password:
    jwt_secret: LJQsMC5tbcaUycvkjpGQzEeR4hP9N587qv7WwH9rvsCvWgQJePp4nFoByT97

totp:
  issuer: authelia.com

authentication_backend:
  password_reset:
    disable: true
  file:
    path: /config/users_database.yml
    password:
      algorithm: argon2id
      iterations: 1
      salt_length: 16
      parallelism: 8
      memory: 64

access_control:
  default_policy: deny
  rules:
    - domain:
      - "*.domain.com"
      policy: one_factor
      subject: "group:admins"

    - domain: send.domain.com
      policy: two_factor
      subject: "user:anon"

session:
  name: authelia_session
  # This secret can also be set using the env variables AUTHELIA_SESSION_SECRET_FILE
  secret: WHTyUGVm3j424CraVgAgEnrGdT9cu9Wu3pfgjor7h3P53q6uAdaJ85eAbDCx
  expiration: 8h
  inactivity: 2h
  cookies:
    - domain: 'domain.com' # Should match whatever your root protected domain is
      authelia_url: 'https://auth.domain.com'

regulation:
  max_retries: 3
  find_time: 120
  ban_time: 300

storage:
  encryption_key: a_very_important_secret # Now required
  local:
    path: /config/db.sqlite3

notifier:
  filesystem:
    filename: /config/notification.txt
That was all the configuration needed, so now it’s time to create the Authelia container. This is how the docker-compose.yml file looks like:
version: '3'

services:
  authelia:
    image: authelia/authelia
    container_name: authelia
    volumes:
      - ./authelia:/config
      - ./authelia/log:/var/log/authelia
    networks:
      - proxy
    labels:
      - 'traefik.enable=true'
      - 'traefik.http.routers.authelia.rule=Host(`auth.domain.com`)'
      - 'traefik.http.routers.authelia.entrypoints=https'
      - 'traefik.http.routers.authelia.tls=true'
      - 'traefik.http.middlewares.authelia.forwardauth.address=http://authelia:9091/api/verify?rd=https://auth.domain.com'
      - 'traefik.http.middlewares.authelia.forwardauth.trustForwardHeader=true'
      - 'traefik.http.middlewares.authelia.forwardauth.authResponseHeaders=Remote-User,Remote-Groups,Remote-Name,Remote-Email'
    expose:
      - 9091
    restart: unless-stopped
    environment:
      - TZ=Europe/London
      - PUID=1000
      - GUID=1000
    healthcheck:
      disable: true
networks:
  proxy:
    external: true
As you can see, it is similar to a normal service proxied by Traefik, but with three new labels. These three labels are creating a middleware called authelia, a middleware being an extra configuration to the requests before they are sent to your service by a router. This middleware will forward authentication requests to the Authelia container at http://authelia:9091 with a redirect URL of https://auth.domain.com. trustForwardHeader means that it will trust all X-Forwarded-* headers, e.g. X-Forwarded-For, and authResponseHeaders specifies a list of header that Authelia returns.
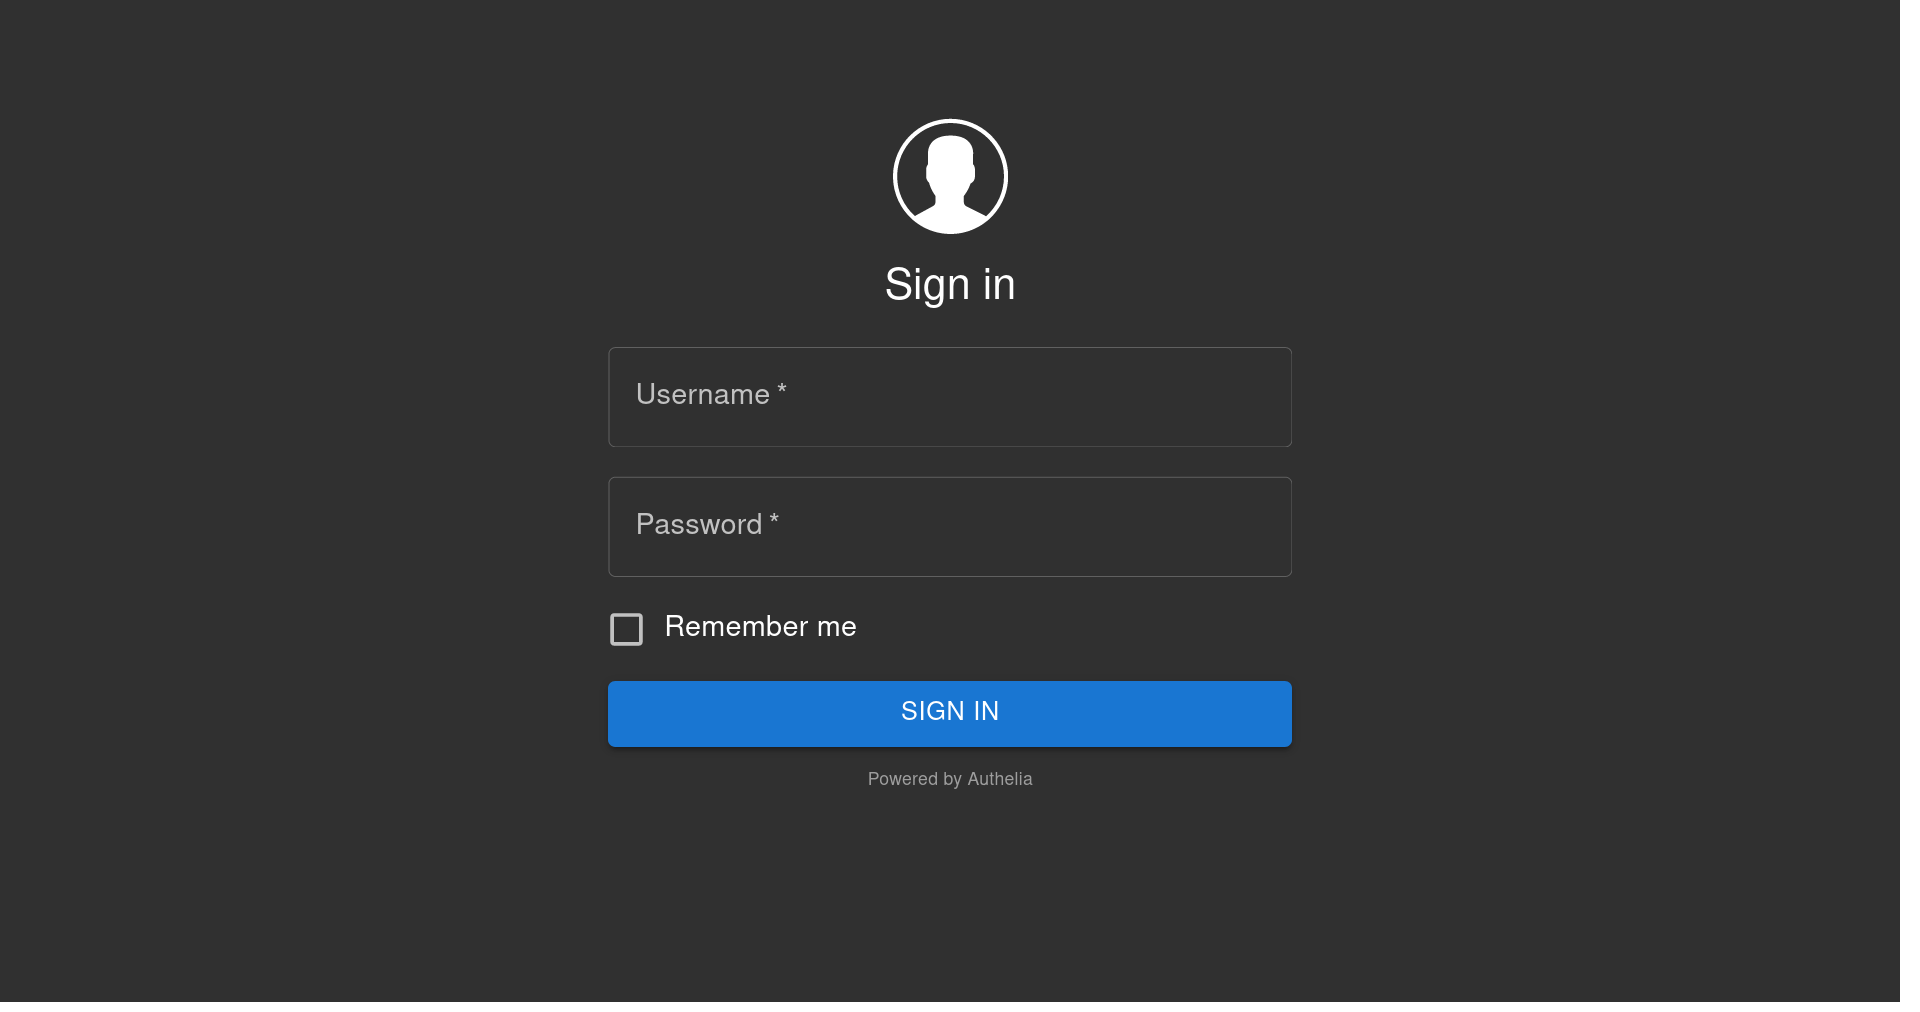
To make sure it is working, you can go to https://auth.domain.com after setting up the DNS entries and you should see:
When you log in, you should see a webpage asking you to register a device. Click on Methods > One Time Password, then click on Not registered yet. After that, you should see a notification saying: An email has been sent to your address to complete the process. If you configured SMTP in configuration.yml, you should see a new mail in your inbox. If you used file-based as the example provided before, you should see a new file called notification.txt, which will include a URL in which you will be able to set up your One Time Password. Authelia also supports Security keys and Push Notification, however I haven’t tested those yet.
Now that you have Authelia running, the next step is to protect a service you want with it. For containers hosted on the same machine, you just need to add one addition label in it’s docker-compose.yml, the new label to add is:traefik.http.routers.service-name.middlewares=authelia@docker. You are basically adding a new middleware, in this case the Authelia service.
Here is an example with Libreddit protected with Authelia as it doesn’t come with its own authentication system.
version: '3'

services:
  libreddit:
    container_name: "libreddit"
    image: spikecodes/libreddit
    user: "1000:1000"
    restart: unless-stopped
    networks:
      - proxy
    labels:
      - "traefik.enable=true"
      - "traefik.http.routers.libreddit.entrypoints=https"
      - "traefik.http.routers.libreddit.rule=Host(`libreddit.domain.com`)"
      - "traefik.http.routers.libreddit.tls=true"
      - "traefik.http.services.libreddit.loadbalancer.server.port=8080"
      - "traefik.http.routers.libreddit.middlewares=authelia@docker"

networks:
  proxy:
    external: true
For services that aren’t running on Docker or are running in another machine, you will need to edit config.yml and add a middleware for the router you want. Using the same example of Sonarr as before, this is how it should look like:
http:
 #region routers
  routers:
    sonarr:
      entryPoints:
        - "https"
      rule: "Host(`sonarr.domain.com`)"
      middlewares:
        - authelia
      tls: {}
      service: sonarr

  services:
    sonarr:
      loadBalancer:
        servers:
          - url: "https://192.168.1.103:8989"
        passHostHeader: true

  middlewares:
    authelia:
      forwardAuth:
        address: "http://authelia:9091/api/verify?rd=https://auth.domain.com"
With this, you are creating a new middleware called authelia and you are adding it to the sonarr router.
This is how your folder should look like:
./authelia
├── configuration.yml
├── db.sqlite3
├── log
├── notification.txt
├── users_database.yml
└── docker-compose.yml
Now, whenever you sign in with Authelia, you will get a session cookie for that whole entire domain, so if you have multiple services protected by Authelia, you will only need to authenticate once to get that session cookie. As you can see, Authelia is a really powerful tool, and it is also really easy to set up and connect your services.
Cloudflare Tunnels
The main reason for setting up Cloudflare Tunnels is that it allows remote access to your self-hosted services without needing to forward any ports, therefore avoiding some security implications, also you don’t need a static IP to use it.
To install cloudflared, the client for Cloudflare Tunnels, on a Debian-based system, run:
wget -q https://github.com/cloudflare/cloudflared/releases/latest/download/cloudflared-linux-amd64.deb && sudo dpkg -i cloudflared-linux-amd64.deb
However, if you are in any other system you can check the official guide on how to install it.
Once installed, login to your Cloudflare account with:
cloudflared tunnel login
To create a tunnel, which is a connection between your machine and the Cloudflare edge, run:
# cloudflared tunnel create <NAME>
cloudflared tunnel create homelab
From the output of the command, you will need to take note of the tunnel’s UUID and the path to the credentials file of your tunnel.
Then, create a configuration file at ~/.cloudflared/config.yml, this file will configure the tunnel to route traffic from a given hostname to the service of your choice. Add the following fields to the file:
tunnel: <Tunnel-UUID>
credentials-file: ~/.cloudflared/<Tunnel-UUID>.json

ingress:
  - hostname: auth.domain.com
    service: https://192.168.1.48:443 # Traefik internal ip
    originRequest:
      originServerName: "auth.domain.com"

  - hostname: other-service.domain.com
    service: https://192.168.1.104:8384
    originRequest:
      originServerName: "other-service.domain.com"
  - service: http_status:404
Through the same tunnel, you can route multiple applications. In the example above, it is routing auth.domain.com to the service at https://192.168.1.48:443, which should be where Traefik is hosted. If you want to share an application that doesn’t require Authelia, you can send the request directly to it instead of going through Traefik, however if you proxy requests through Traefik, you would get the certificates generated by Traefik.
Once you have finished, you will need to assign a CNAME record that points traffic to your tunnel. To do that you will need to run the following command for each hostname you included in ~/.cloudflared/config.yml:
# cloudflared tunnel route dns <UUID or NAME> <subdomain>
cloudflared tunnel route dns 'homelab' auth
Finally, start cloudflared as service, so whenever you reboot your system it will start routing traffic automatically:
sudo cloudflared --config ~/.cloudflared/config.yml service install
sudo systemctl enable --now cloudflared
Now if you go to auth.domain.com, you should see the Authelia web portal even when you are away from home. As you can see, Cloudflare Tunnels allows you to expose services to the internet without worrying about exposing ports directly to the scary internet, this also means that you won’t be sharing your IP address to the world because they will be connecting to the Cloudflare servers first.
⚠ WARNING: Remember to run sudo systemctl restart cloudflared if you add a new IP routes or change the configuration file.
Fail2Ban
The last thing to configure is Fail2ban, which is a software application that protects you from brute force attacks. It monitors the application logs and you can tell Fail2ban after how many log errors in a specific time interval it should ban the remote source.
Before you start configuring Fail2Ban, you need to know that when using Cloudflare Tunnels, you will see in your application logs that the IP obtained is the internal IP of the machine where cloudflared is installed. To read the real IP, you will have to let the service read the X-Forwarded-For header which contains the real IP, each service will have a different configuration for this. For Traefik, add this to the HTTPS entrypoint section in your traefik.yml:
    forwardedHeaders:
      trustedIPs:
        - "192.168.0.0/16"
So your entrypoint section would look like:
entryPoints:
  http:
    address: ":80"
    http:
      redirections:
        entryPoint:
          to: https
          scheme: https
          permanent: true

  https:
    address: ":443"
    forwardedHeaders:
      trustedIPs:
        - "192.168.0.0/16"
Your internal IP must be included in where it says 192.168.0.0/16, if it is not, you must change 192.168.0.0/16 to a range of IPs that includes your internal IP.
To install Fail2ban, you will need to bind all the log files you want Fail2Ban to read, the following is a docker-compose.yml with the log files from Authelia, Nextcloud, Vaultwarden and Navidrome:
version: "3.5"

services:
  fail2ban:
    image: crazymax/fail2ban:latest
    container_name: fail2ban
    network_mode: "host"
    cap_add:
      - NET_ADMIN
      - NET_RAW
    volumes:
      - "./data:/data"
      - "~/authelia/log:/var/log/authelia:ro"
      - "~/nextcloud/nextcloud.log:/var/log/nextcloud/nextcloud.log:ro"
      - "~/vaultwarden/vaultwarden.log:/var/log/vaultwarden/vaultwarden.log:ro"
    restart: always
You will need to find out where the log files are located for each of your services. With Authelia, in the authelia/configuration.yml you told Authelia to save log files at /var/log/authelia/authelia.log of the docker container which was then binded to ./authelia/log of your host with Authelia’s docker-compose.yml.
To configure Fail2Ban, the first step is to create a Fail2ban action, here you define what to do with the user when an attack is detected, although Fail2ban includes some actions, I had some trouble making them to work with Docker, so I recommend creating a new action that bans the user with Cloudflare. This means that when the user is banned, he won’t be able to access any of your sites configured with Cloudflare Tunnels.
The action file needs to be located at .data/action.d/cloudflare-apiv4.conf with the following content:
[Definition]

# Option:  actionstart
# Notes.:  command executed once at the start of Fail2Ban.
# Values:  CMD
#
actionstart =

# Option:  actionstop
# Notes.:  command executed once at the end of Fail2Ban
# Values:  CMD
#
actionstop =

# Option:  actioncheck
# Notes.:  command executed once before each actionban command
# Values:  CMD
#
actioncheck =

# Option:  actionban
# Notes.:  command executed when banning an IP. Take care that the
#          command is executed with Fail2Ban user rights.
# Tags:      IP address
#            number of failures
#            unix timestamp of the ban time
# Values:  CMD

actionban = curl -s -X POST "https://api.cloudflare.com/client/v4/user/firewall/access_rules/rules" \
            -H "X-Auth-Email: <cfuser>" \
            -H "X-Auth-Key: <cftoken>" \
            -H "Content-Type: application/json" \
            --data '{"mode":"block","configuration":{"target":"ip","value":"<ip>"},"notes":"Fail2ban <name>"}'

# Option:  actionunban
# Notes.:  command executed when unbanning an IP. Take care that the
#          command is executed with Fail2Ban user rights.
# Tags:      IP address
#            number of failures
#            unix timestamp of the ban time
# Values:  CMD
#

actionunban = curl -s -X DELETE "https://api.cloudflare.com/client/v4/user/firewall/access_rules/rules/$( \
              curl -s -X GET "https://api.cloudflare.com/client/v4/user/firewall/access_rules/rules?mode=block&configuration_target=ip&configuration_value=<ip>&page=1&per_page=1&match=all" \
             -H "X-Auth-Email: <cfuser>" \
             -H "X-Auth-Key: <cftoken>" \
             -H "Content-Type: application/json" | awk -F"[,:}]" '{for(i=1;i<=NF;i++){if($i~/'id'\042/){print $(i+1);}}}' | tr -d '"' | sed -e 's/^[ \t]*//' | head -n 1)" \
             -H "X-Auth-Email: <cfuser>" \
             -H "X-Auth-Key: <cftoken>" \
             -H "Content-Type: application/json"

[Init]

# Name of the jail in your jail.local file. default = [jail name]
name = npm-docker

# Option: cfuser
# Notes.: Replaces <cfuser> in actionban and actionunban with cfuser value below
# Values: Your CloudFlare user account

cfuser = user@mail.com

# Option: cftoken (Global API Key)
# Notes.: Replaces <cftoken> in actionban and actionunban with cftoken value below
# Values: Your CloudFlare API key
cftoken = TOKEN
You will need to change the value of cfuser and cftoken with your Cloudflare’s account mail and Global API Key respectively.
Authelia
Now it is time to define the filters for Authelia’s log file, which should contain a regex pattern that detects an authentification error. You can try to create your own regex pattern but usually in your application’s documentation or forums you should find a regex pattern for Fail2Ban. In the case of Authelia, it is included in their official documentation.
To create a filter for Authelia, create ./data/filter.d/authelia.conf with the following lines:
[Definition]
failregex = ^.*Unsuccessful 1FA authentication attempt by user .*remote_ip="?<HOST>"? stack.*
            ^.*Unsuccessful (TOTP|Duo|U2F) authentication attempt by user .*remote_ip="?<HOST>"? stack.*

ignoreregex = ^.*level=debug.*
              ^.*level=info.*
              ^.*level=warning.*
The next thing to configure would be a jail file, this will contain configuration for each service like the allowed amount of errors permitted, ban time, action, etc. This should be located at data/jail.d/, so for Authelia, create and edit data/jail.d/authelia.local with:
[authelia]
enabled = true
port = http,https,9091
filter = authelia
logpath = /var/log/authelia/authelia.log
maxretry = 3
bantime = 1d
findtime = 1d
chain = INPUT
action = cloudflare-apiv4
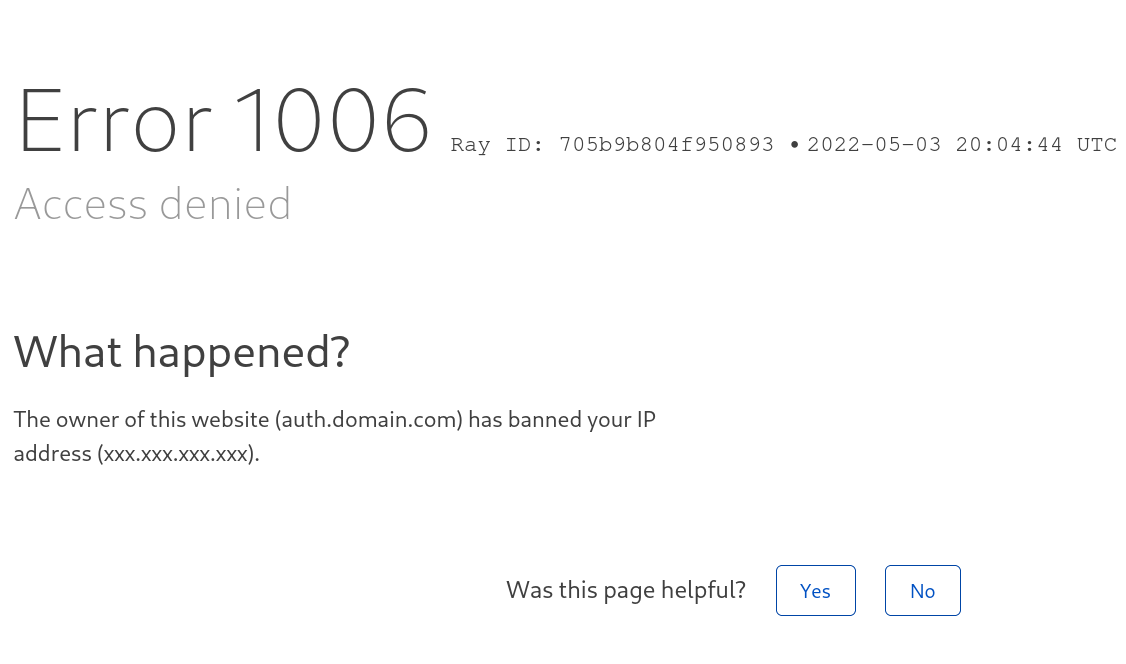
With this configuration, you are telling Fail2ban to use the log file located in /var/log/authelia/authelia.log and filter it with authelia which is the file previously created in ./data/filter.d/authelia.conf. Then, if it finds 3 errors in less than a day, ban it with the action defined in .data/action.d/cloudflare-apiv4.conf for one day. You can ban it forever with bantime = -1. Now if you go to auth.domain.com and make three errors you should see:
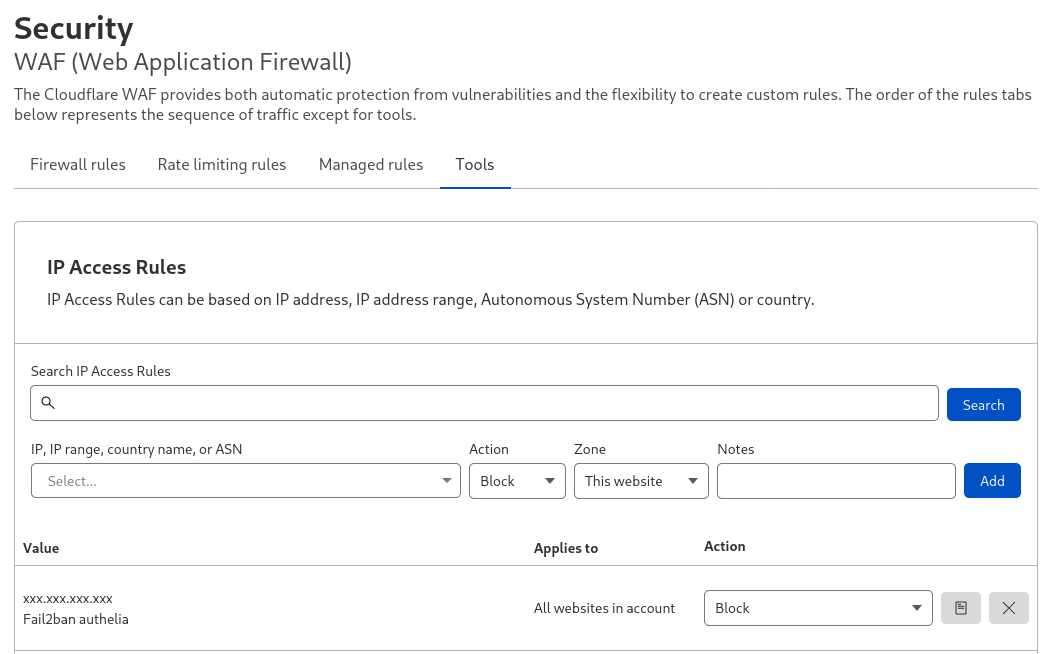
To unban yourself, go to the Cloudflare dashboard > Security > WAF > Tools and remove the entry:
That should get you unbanned at Cloudflare level, but Fail2Ban keeps a list of banned IPs and you will have to delete your IP from that list as well, to do that, run: docker exec fail2ban fail2ban-client unban <IP>.
And that’s all, now you should look how to apply Fail2ban for your services. The last thing I will leave you with is two more examples with Nextcloud and Vaultwarden, two of the most popular self-hosting applications.
Nextcloud
By default Nextcloud doesn’t create a log file, to tell Nextcloud to make one, find config/config.php and add:
'datadirectory' => '/data',
This will create a nextcloud.log file at the /data directory on the docker container which should be already binded in your docker-compose.yml. In addition, Nextcloud will not by default trust forwarded proxies so you will need to add it just like you did with Traefik, therefore, add the following lines to config/config.php:
  'trusted_proxies' =>
  array (
    0 => '192.168.16.0/24',
  ),
  'forwarded_for_headers' => array('HTTP_X_FORWARDED_FOR'),
Again, edit 192.168.16.0/24 to a range of IPs that includes your machine’s internal IP. After this, all that remains is to create the filter and jail as you will probably want to use the same Cloudflare action.
This is the filter which should be located at .data/filter.d/nextcloud.conf.
[Definition]
_groupsre = (?:(?:,?\s*"\w+":(?:"[^"]+"|\w+))*)
failregex = ^\{%(_groupsre)s,?\s*"remoteAddr":"<HOST>"%(_groupsre)s,?\s*"message":"Login failed:
            ^\{%(_groupsre)s,?\s*"remoteAddr":"<HOST>"%(_groupsre)s,?\s*"message":"Trusted domain error.
datepattern = ,?\s*"time"\s*:\s*"%%Y-%%m-%%d[T ]%%H:%%M:%%S(%%z)?"
And this is the jail at .data/jail.d/nextcloud.local:
[nextcloud]
backend = auto
enabled = true
port = 80,443
protocol = tcp
filter = nextcloud
maxretry = 3
bantime = -1
findtime = 10m
logpath = /var/log/nextcloud/nextcloud.log
chain = INPUT
action = cloudflare-apiv4
Vaultwarden
To make Vaultwarden produce a log file and show the real IP, add these environment variables to your docker-compose.yml:
    environment:
      - IP_HEADER=CF-Connecting-IP
      - LOG_FILE=/data/vaultwarden.log
      - LOG_LEVEL=warn
Then the filter at ./data/filter.d/vaultwarden.conf would be:
[INCLUDES]
before = common.conf

[Definition]
failregex = ^.*Username or password is incorrect\. Try again\. IP: <ADDR>\. Username:.*$
ignoreregex =
And the jail at ./data/jail.d/vaultwarden.local:
[vaultwarden]
enabled = true
port = 80,443,8081
filter = vaultwarden
logpath = /var/log/vaultwarden/vaultwarden.log
maxretry = 3
bantime = -1
findtime = 1d
chain = INPUT
action = cloudflare-apiv4
You did it
If everything works correctly, congratulations! You have effectively configured Traefik, Authelia, Cloudflare Tunnels and Fail2Ban. It’s a bit of a long process but with this you should be able to host and share all your homelab services with SSL without port forwarding and with some protection. I hope you found this guide useful :)